Here is the project. It’s a Gibson Les Paul, likely from the
later 70’s or so. The current owner has owned it for something like 30 years
and while he hasn’t played it in a while he has a very sentimental attachment
to this particular guitar. He was fully aware of its history and some of its
defects and told me about them before he even brought it in as he wasn’t sure I
would take on this project. What can I say, I’m a sucker for a tough
project……and this is a rough one. Here it is pretty much as it came in. I
pulled the strings and bridge while I examined and talked over the scope of
work with my client.
Lots of ugly black paint all over….even the bindings. And
that still couldn’t hide one obvious flaw that was sort of resistant to
photography but was easily seen as soon as the case was opened, this guitar was
one of those that was cut up into pieces at the factory and then put back
together by someone. Judging by the deluxe bindings top and back this one was
going to be a black beauty. In this pic
if you look where I scraped the paint off the binding you can see the cut.
I could see other issues……right off the bat there was
something really odd about the headstock besides its obvious lack of adornment.
The hardware and electrics were beyond salvation. This quickly went from a
re-finish job to a full on restoration…or maybe resurrection might be a better
term. He agreed and told me to use my best judgment on all matters, he just
wanted this guitar to finally look as good as it sounded. So the first real
order of business was to strip off the finish. A job that seemed to go on
forever…..they must have put 2 qts. of lacquer on, Perhaps at different times.
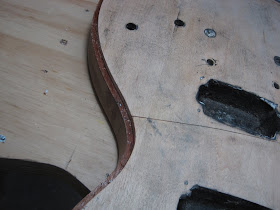
But it was a thick, amateurish mess. Here you can get a good view of the cut
where the body was put back together.
And here is the view from the back. Not any prettier back
here.
Any missing binding was simply filled with what appeared to
be some type of epoxy. Whatever was used to glue the body back together most
likely.
Here we can see the absolutely awful prep work at the base
of it all. Bad enough old Lester here was cut up like the magicians assistant but look at the marks left by the ¼ sheet
sander. Looks like 80 grit was it…that’s good enough. The edges of the bindings
were all tore up by someone trying to sand the ABS plastic round. Yeah that
didn’t work out so nice either…so they just filled it with paint.
Now we can start to see what was wrong with the headstock. I
had initially thought it was a broken neck repair gone wrong. I was partly
right….it was a repair gone wrong, just not a break. The headstock had been
sawn off as well and put back together not quite right.
Here was a large part of the problem with the headstock. It
was from a different guitar, you can see a sunburst finish here where I
stripped the paint. This would also explain the lack of binding or large pearl
inlay that should have been here.
It played and stayed in tune as it was and I was going to
leave it until I noticed something disturbing. A back veneer had been used as
part of the graft and as I striped the paint my putty knife caught the bottom
of the veneer and lifted it. Looks like there was nothing but lacquer that had
seeped in actually gluing a portion of the veneer down. That was it. This
needed to be fixed. And in for a penny,
in for a pound. I just couldn’t see leaving the rest of the repair as it was
with a slight twist so the whole thing was coming back apart and being put back
to spec. Here you can see the lacquer in the joint after I popped the back
veneer off.
Now you can see where the head was sawn off and put back
together. Hey I guess at this point I should just be happy that both the neck
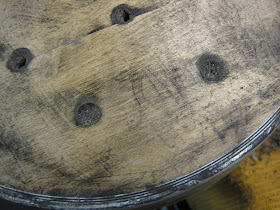
and the donor head were Maple. There are quite a few holes and broken screws in
the center as well that were lurking under the veneer. Not sure what that’s all
about.
The whole mess was done in epoxy too……ARGH! Makes this
harder than it had to be. Would have been one thing if the original repair had
been straight and solid but taking apart epoxy is a bummer. And then you need
to get to clean white wood again because nothing will stick to epoxy that has
been heated and taken apart, at least not all that long. It was then that I
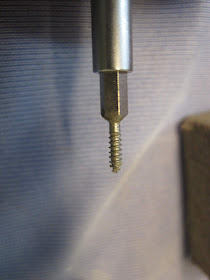
found the true seeds of a bad repair. Two fluted concrete nails with their
heads ground of were used as dowels. To make matters worse they were centered
on the glue joints in the neck lamination, visibly breaking the joint in a few
places. Nice!
Here is the donor head. You can see where the faceplate
didn’t make solid contact with the wood and was sorta kinda filled with epoxy.
To complicate matters more a twist had been put into it due
to misalignment of the nails in the different pieces and then partially sanded
out. This left me with the only true surfaces left being at a 90 degree plane.
One being the top edge of the donor head and the others being the walls of the
tuner holes. So I made a fixture to hold the pieces so I could machine them
back true and also hold them in the correct alignment for reassembly. The only
thing I had for a reference was the tuner holes so that is what I indexed in my
jig. By using a set of attached side rails I could use my joiner to true up the
faces of the donor and get back to flat and true. And get rid of all that nasty
epoxy.
When I made my jig
and loaded all the parts into it to see how it all stacked up another problem
arose. Manufacturing tolerances at the Gibson factory are not as tight as most
might like to think. The two parts we are trying to mate were made on different
jigs….and well a picture is worth a thousand words.
I glued some maple wings onto the places that needed it so
the two parts could mate properly and be reshaped to fit the face veneer. In
this shot you can see how much twist was in the original repair.
So here we are with the two parts of the headstock glued
back together with nothing but the face veneer holding them when the jig is
removed. It is very fragile right now and you can see the wings that were added
so the overall shape can be restored.
This obviously needed some reinforcement. And I still had
the split joints from those damned nails to deal with. So I cut in some splines
and glued them in. Then I carefully carved and shaped the splines and the lower
part of the headstock back to flat and true.
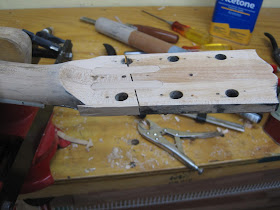
This left the headstock way too thin…by 5/16”! So I cut and
fitted a new piece of maple and glued on to replace the missing back of the
headstock. Here it is all shaped in. All I need to do is drill the tuner holes
through it and it’s almost perfect. Once it’s finished you won’t ever know. And
all this was done with hide glue…so if this happens to need worked on in the
future it will be easy to do so.
I thought
that I may be able to simply splice in some new bindings at the waist where the
cut was. But after stripping the finish and getting a good look at everything
and how chewed up some of the binding was from the original finisher and his 80
grit palm sander I thought better of it. So I cut the bindings and purflings
off. On the top all the plys are the same height and this is a wide binding
model.
On the back
the arrangement was more typical of a binding and purfiling combo with a full
height binding and shorter purflings.
For the back
I welded together the 3 ply purflings to make this a 2 piece affair when it
came to gluing it to the body. The top is an 8 ply arrangement and they are all
full height. So I welded together some subassemblies. One 3 ply and one 4 ply
to be used with one thicker binding around the outside. This matter is made a
bit trickier as the neck is still attached. So the pieces need fitted around
the horn and back underneath the fret board. I used my heat gun to soften the
sections at the tight bend around the horn so they would bend easily and the
black plys did not become pale. I also had to build the section up in height as
well because of the wide binding which I did before bending and fitting.
I glue it up
and use a few pieces of strapping tape to temporarily hold it in place. Then
it’s time to bind the bindings. I have used rope in the past and sometimes even
just tape but for this with all these plys rubber bands are the only way to
fly.
After the
glue has set I use a crane neck chisel to trim the new bindings. I hunt them
down until they are only a few thousandths of an inch above the surface like
this.
Then it’s
time to scrape them flush with a card scraper. Here we can see the new work on
the back.
The only
reason I could find for this guitar being scrapped was bridge position. Even
afet being cut and put back together the scale length was still about .030”
long. So I cut some maple plugs and filled the old holes so I could marks and
drill new ones at the proper location.
All the
hardware is being completely replaced with gold. And as it turns out the bushings
for the new stop bar are slightly smaller so those holes were then also plugged
and re-drilled to the proper size. A bit more work on the headstock yet as
well. The area where the nut will sit is only flat for about half of what it
should be from the double repair of the headstock. The black fiber veneer stops
a wee bit short of nut as well leaving a white line of maple showing. This will
get filled with some black filler before I prep for finish.
With those
last few items taken care of it is time to begin the finishing process.
Previously on guitars with major repairs
like this I have always used an epoxy as a filler and sealer. This helped insure the repairs will not ghost
through the finish. Certain finishes are more forgiving in this respect than
others. But the epoxy is a laborious affair taking 3 days and is a bugger to
sand out. So beginning with this guitar I am using a new (to my shop) product.
It is a post catalyzed high build polyester filler/sealer. It is water white
(or completely clear) and HAPS free. It can be applied at up to 10 mils wet and
easily build to 12 mils dry with a few coats as it does not have the usual mill
barrier of 5 mils typically associated with post cat coatings. The guitar is
sanded out by hand to 180 grit. The bindings are lightly scraped and it’s into
the booth for a few coats of sealer. Here it is later that day, ready to sand
and prep for the black nitro.
This should
also take care of any remaining artifacts of the headstock repair.
The sealer was sanded out at 320 to give a good anchor to
the lacquer on the polyester. And the bindings taped off. I have scraped
bindings, and these will still get scraped but I do a lot of guitars with wood
bindings which can’t be scraped so I have gotten accustomed to just taping them
off.
Finishing is a
process. It differs somewhat by the type of material being used but it is
always a process that will work to its own particular schedule. While my sealer
is a catalyzed product the actual finish I am using on this project is
Nitrocellulose. The product I use is a
pure nitrocellulose just like was used in the old days. As such it needs to dry
thoroughly between coats. The weather here so far this year has been quite
“soupy”, limiting days that I can run my spraybooth. I will not spray on rainy days or days when
RH tops about 80%. It’s just not productive and doesn’t yield the quality I
strive for. Anyway, the color coats got sprayed over the sealer. In this case
basic black, 5 coats. I actually had good holdout at 4 but wanted a bit extra to
block out since there are some large repairs that are not mine involved here.
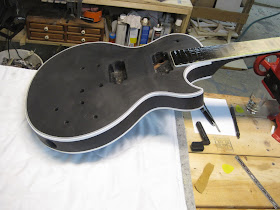
After drying for about a week here in the shop the color
coat is block sanded out. This is done
with a small cork lined block and 400 grit paper, dry. A lot of attention and
care is focused on the edges of the binding. Any paint out on the binding is
carefully scraped away and the edges of the paint very carefully sanded out. When
taken care of now the chance of burning through the clear coat when buffing is greatly
reduced.
The face of the headstock got 2 wet coats of clear and was
block sanded out. A new Water slide Les Paul decal is placed on the
headstock. Next week it will go back out
to the booth and get 5 -6 coats of clear
depending and then we wait……..so stay tuned, We will finish this in a few
weeks.
I noticed before
level sanding that there was quite a bit of shrink back over the diagonal line
of the old body repair. That joint has been keeping me up at nights......I hate
finishing over old repairs done with questionable methods. Also there was a lot
of shrinkage over the factory joints in the top, it is a 3 piece top.
Everything level sanded well though so I buffed it out. The buffing wheels generate a good deal of
static electricity and here you can see how the epoxy in the old repair takes a
charge and the fuzz from the wheel sticks to it. This is another reason I have
moved away from epoxies.
Here you can see after it is all buffed out that old repair
is gone.
So I then unmasked the fret board and preceded to do a full
level and crown.
Time to start prepping for assembly. I used a countersink
bit to cut back the lacquer a bit and chamfer the bushing holes so they will;
not chip or crack when I put them in.
It was at this time something caught my eye. The joints in
the 3 piece top run not only through the control cavities but they run right
through a set of pot holes. It was in the area between the pot holes and out to
the very edge of the cavity there was the faintest hairline crack formed in the
finish. There was a good bit of shrink back of the finish over these joints in
the top but it sanded out when I leveled so I gave it not a second thought. I
took a close look at the switch hole and sure enough, a little hairline cracks
in the finish through the hole and stopping at the edges of the cavity. CRAP!
These defects are the type that I refer to as photographically resistant. So
while they won’t show in a picture, I could see them and knew what it
meant……There was a stability issue with the joints in the maple where it was
not backed by the mahogany…….DOUBLE CRAP! So these joints must be stabilized
and the top will get refinished. That’s just the way it goes on jobs like this.
If it doesn’t meet my standards it gets re-done and I consider this my problem
so the refinish of the top doesn’t go on the invoice.
Ok, we are back on track. It’s time to wrap this project up.
It’s like déjà vu all over again. I swear I spend half my life sanding things.
Here I am level sanding the top that was re-finished so I can buff it out.
The first thing I do after getting it all buffed out again
is install the tuners. In this case I am using some Locking Grovers. I do them
in pairs working up the headstock. I use my 6 inch rule as a straightedge to
make sure they line up.
One of the handiest tools I have around the shop is the Stew
Mac guitar tech screwdriver set. Not just because it has almost any size bit
you will likely need to work a guitar in a small package but for these. There
is a set of taps that fit all the small woodscrews we use. So after I drill my
pilot holes I lube the tap with some bee’s wax and thread the hole. This
virtually eliminates the possibility of a buggered screw head as the screws go
in smooth as butter.
Here it is with all the tuners in. Looks really good
considering that it was a real mess when it came in. You’d never know all the
work that was done by just looking. And that is always my goal.
Now it’s time to start with the wiring. First I need to make
sure the pickup mount rings fit the body perfectly. To do this I line the back
of a strip of 220 paper with some packing tape. This provides for scratch
protection on the backside of the paper. The rings are then gently slid back
and forth to floss them into a perfect fit. The trick here is to hold the paper
firmly so it doesn’t move and to clear away sanding debris and check the fit
often.
The wires are fed through the chase and the pickups aligned
to the fretboard. I use blue tape on the top so I can make reference marks with
a fine sharpie so I can get that alignment.
I pilot drill the holes and again use my tap and some wax and then mount the pickups. I have also ran a
4 conductor lead in the channel for the switch prior to mounting the pickups.
I wire and install the switch. I always leave a loop of wire
around it as you see here after install to make any future repairs easier.
Time to finish this up. I completed the wiring. Some people
don’t like the metal base plate that Gibson uses, I actually like it. The plate
provides some shielding and provides ground for all the pots. The pots are CTS
500K and the caps are ceramic .47’s This is a standard les paul type set up
without any coil taps or other tricks.
I leveled and crowned the frets earlier. Now it is time
polish them up. I do them one at a time working my way up the board. I use the
3M polish cloth sold by stew mac. I wrap small pieces around a rubber eraser
and work my up through the grits. It goes pretty quick and puts a mirror like
shine on the frets leaving them feeling super smooth.
Now I can get some strings on and make a nut. I make all my nuts
custom from blank pieces of bone. I do not like the pre made, pre slotted ones.
After I have cut the blank to size and beveled the top I lay out the string
positions and take my .010” fret slot file and make a slight cut on each center
mark. This helps me maintain proper spacing, especially on the thicker wound
strings that are wider than my original pencil marks. I then go back and make a
starter slot with the correct size file for each string and string up the guitar to pitch. I check that the
truss rod is close to final adjustment and then set each string slot to proper
depth with the correct file. I check the depth, lift the string out of the slot
and adjust. I use a piece of leather across the head stock above the nut like
you see here so when the E strings drop off the edge to file the slots it
doesn’t mar the finish.
After that it is a matter of final adjustment on the truss
rod, set the pickup heights and pole pieces for balance and set the intonation.
Clean off all my paw prints and it’s finally done. Now that it is set up and
playing I can see why Jim loves it so much, this is one sweet feeling &
sounding Les Paul.
And you cannot see that the body was ever cut in half. While
it was a rejected by Gibson during manufacturing it is definitely worthy of the
Gibson name now.
Hope everyone enjoyed following along with this project and
if I can ever be of help to anyone out there feel free to call.
www.brianhowardguitars.com
www.brianhowardguitars.com











Outstanding!
ReplyDelete~Kbore