We can see that the fret wear is pretty bad and the crowns are quite low. No more level and crown jobs to be had on these frets. If you look closely you should be able to tell this was over sprayed, the flow into the older chips is a tell.
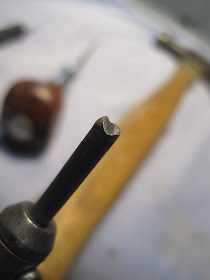
My tool kit for the job is very simple, 4 pieces. An Exacto knife with a fresh blade, an awl with a fresh point, a 16 oz hammer and a modified 30 watt soldering iron. My refret soldering iron is the most important of the three and was chosen with respect to the job it needs to do. The tip is bent at about 30 degrees to make it a bit more comfortable to use and the end has a shallow bird’s beak notch filed into it so it will ride on the crown of the fret without slipping off. The notch must be deep & steep enough to keep it on the fret and provide maximum tip to fret contact for heat transfer but shallow enough that the edges do not touch or get too close to the fret board itself or it will scorch a nice neat black line on each side of the fret. The wattage is important too. Low wattage hobby and craft solder irons are perfect for this. A lot of grief is encountered when installing the new frets if they are overheated for removal. Overheating the fret scorches and hardens the walls of the fret slot, you know the part where the barbs on the tang bite into to hold the fret down. This makes the new frets not want to seat tight and is the leading reason so many others need to glue the new frets in to keep them on the instrument. Unless I am doing a 3rd or 4th refret on a guitar I almost never need to glue new frets in, so you guys running actual beads of solder down the frets don’t say I didn’t warn ya…..
The process for these frets is quite simple but nerve wracking. The pucker factor increases as the height of the old fret decreases. First I gently heat the fret a bit, just get it a bit warm. All I want to do first is heat it enough to soften the lacquer. The lacquer was applied over the frets so it must be dealt with carefully to avoid it chipping and flaking off. Loss of original finish is a sin! Once warm I carefully cut through the finish on each edge of the fret so it can be removed without damage. I then start to heat the fret for removal. How long? How hot? Well that depends and there is a feel to develop here. Different woods respond better at different temps. I work back and forth heating the entire fret evenly and when the temp is right I drive the fret back out by digging the awl into the end and driving it out with the hammer. This is where those thin worn out fret crowns can get you, you must make sure you are driving right over the tang. The edges will peel like tin foil and you will gouge the board. You must also keep the awl tip at a proper working angle and be careful not to drive it into the fret too deep as you work or you will dig up the slot. The frets were put in from the bass side of the board so we drive them out from the treble side.
Here we can see how nice and clean this fret came out….the slot is like new and will take a new fret nice and tight without glue. The new frets are typically installed in traditional, driven in from the top.


Brian, how does this procedure change for a brazilian rosewood pre-cbs P-bass? I guess there is no laquer over the frets, does it still need to be heated?
ReplyDeleteThanks
Davo
Yes you still use heat. Same procedure.
ReplyDelete