SETTING THE BRIDGE ON A NEW ACOUSTIC
Brian Howard
Here I will show how I remove the finish underneath and set a bridge on
a new acoustic build. This whole process is very quick and efficient, about 30
minutes start to finish. I have already set and glued the neck. The finish
under the fret board extension was removed in the same manner I will describe
here.
I begin by taping off a large area of the lower bout with blue tape. I
am very careful to apply the strips of tape as tight together as possible
without overlapping. It is very important to have as flat of a surface on top
of the tape as possible with no gaps between the pieces to hold dust and debris
to get good results. If the bottom of
your bridge does not mate nicely on the top without gaps or rocking now is the
time to adjust that by placing a piece of sandpaper (I use 180) over the tape
and flossing until a good fit is achieved. This
example was fit prior to finishing so that step is not shown.
Then
using a fine tip sharpie I layout my centerline. This would be the centerline
of the strings and not necessarily the exact centerline of the body. Be
careful! The spruce under the tape is very soft and you do not want to etch
your centerlines etc. into it under the tape! Using a small piece of tape on
the edge of the bridge I mark its center as well. To position the bridge for
scale I use my compensated scale measurements and measuring along the E-string
lines position the bridge by measuring to the front edge of the slot. I am
using an 18” rule so I do a bit of math and measure from the 12th
fret. You can see my measurements for the two E-strings on the post it I have
right on the top.
Once I am happy with my placement, I carefully trace around the edge of
my bridge with the sharpie. Since I set my bridge based on a pre-routed saddle slot,
I now check to see how square my bridge is to the centerline. It is not perfect
but I would rather live with my bridge out of square a bit more than 1/64” and
have the best possible intonation.
I can then cut out a section of tape at the bridge location. I use my
exacto knife and very lightly and carefully cut the tape. You only want to cut
the tape, if you cut the wood fibers at the edge of the bridge footprint your bridge
will most likely pop off in the not too distant future. I am cutting inside the
line I traced by about 1/32”.
To remove the finish I am using my Dremel tool with The Stew Mac
adjustable base and a 1/8” end mill bit. The small flag of tape you see on the
bit acts as a fan and blows the dust and chips out of the work. I start off
with the depth of my bit just touching the surface of the finish through the
window in my masking. I am running the bit rather slow, around 5,000 RPM. I
then dial the adjustment down as I move the tool in a small circle somewhere away
from the edges of my footprint. The tool will now start to cut into the finish.
Watch carefully as you lower the bit and as soon as you see the finish come up
and leave bare wood stop and lock the adjustment. I now cut the whole way
around the edge of footprint with a double pass and then rout out the center
portion.
This seems a lot more intimidating and dangerous than it actually is. In
fact I caused more touch ups trying to scrape the finish out of this area than
I have using this method.
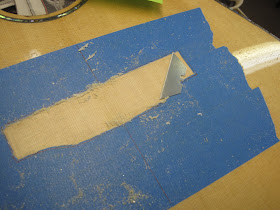
If you did this correctly you should now see some areas that re still
coated by a thin wash of finish/sealer. I scrape these back to bare wood with a
utility knife blade. It is essential to have bare wood here for the glue to
bond to but also not create a recess deeper than the actual finish itself. This
is also a good opportunity to measure your actual finish film thickness after
buffing etc.
I can now remove all my tape and proceed with actually setting the
bridge. I reposition the bridge on the top in the same way as I did earlier and
secure it in position with a single clamp. I then drill my pin holes for the
two E-strings. I will uses these to make sure the bridge goes down on the exact
position I want.
I file a small chamfer all the way around the bottom of the bridge. Tis
will allow my bridge to seat down against the wood of the top tightly as my
finish is just under .005” on this example.
Here is pic of some of my bridge
clamping gear. This always stays together as a tool set. I Make cauls and accessories
to my basic shop made clamp fixture as needed and add them to the kit.
And here is the bridge glued and clamped in place. In 24 hrs I can string it up.
Thanks for following along.


No comments:
Post a Comment